Challenge Rules

Monday, October 21, 2013

Challenge #21: Halloween--Not a Card


HALLOWEEN--NOT A CARD

If we receive at least 10 entries, the prize for this challenge will be a $5 Gift Certificate for SVG files from the Creative Pointe's ON LINE STORE.
You'll find over 150 SVG files/sets available for all your paper crafting projects.
If we have less than 10 entries, the winner will receive this SVG file:  HAUNTED HOUSE.  Winner will be randomly chosen from all submissions.

One extra special entry will receive the"Creative Choice" button.

Ready for some inspiration? Let's take a look at what the Design Team created using SVG diecuts.
Vicki used the HAUNTED HOUSE file for her project.  She says:  "For my design team project, I created a luminary from The Creative Pointe's 'Haunted House' SVG.  It's perfectly dilapidated and haunted looking in it's own right, but it sure was fun to amp up the spooky!  Visit my blog for all the details on how to create your own (and see it lit up!)."  Vicki's blog:  Paper Squirrel

Cindy used the cat from the HALLOWEEN SET ONE on the front of her project.  She says:  "I came up with a cute Halloween countdown slate that is very easy to make.  Head over to my blog for complete step-by-step details, including a look at the decorated back side and free sign pdfs if you'd like to make your own!"  Cindy's blog:  The Creative Pointe

 
Carolyn chose to create french fry boxes using the Haunted Tree file and Halloween Set Two . She says:  "Using a french fry box file from http://www.svgcuttingfiles.comI used the ghost and tombstone from the Halloween Set Two and welded them to the top of the box.  I did the same with the Haunted Tree fry box.  I had a acrylic Halloween stamp that I used to stamp a spider web and spiders on the bottom of the boxes.  The circular sentiments are print and cut, and I also cut out two extra spiders and used the bats from the same Halloween set, making them smaller.  The circular sentiments are placed on foam tape along with the bats and spiders.  A fun container to fill with Halloween candy corn in baggies, to hand out to little ones or to use at a place setting for a Halloween party."  Carolyn's blog:  Granny Ma's Creative Blog


Ruth made some Halloween fun for the kids using the PHOTO PROPS set.  She says:  "I have really been wanting to make some photo props for quite a while and I really loved the idea of "big kids" using the photo props instead of getting dressed up for Halloween (would have been fun if I was still needed to chaperone while trick or treating, but now I can just use them when I give out candy!) I can't wait to see the smiles on the faces of young and old alike who come to my door. For now, here's a picture of some high schoolers modeling the finest (and dare I say funnest?) photo props that can be found!"  Ruth's blog:  Paper and Musings
Octavia used a Jack O'Lantern from the JACK PUMPKINS set and the spider from the BOO Spider file to create this cute treat box.  She says:  "I used the Jack-O-Lantern and the Boo/Spider Sets for this treat box.  Glitter paper for the pumpkins (of course), google eyes, and a coordinating ribbon and tissue paper."  Octavia's blog:  T's Corner For Scrappin'

Tina used a Silhouette file to make the box and then decorated it with files from the HALLOWEEN SET ONE.  She says:  "Here’s a cute little gifty for your favorite spook! I decorated this little favor box (from the silhouette store) with Creative Pointe’s Halloween Set One. Wow talk about some spooky cuts in this set..... A good set of Halloween cuts to have on hand for your Halloween needs.  To find out how the whole project went, well you’ll need to drop by my blog at Tina’s Scrap Corner for a spell."  Tina's blog:  Tina's Scrap Corner

 
Shelissa created this great pillowbox for treats using the PILLOWBOX file and then decorated it using the bat from the HALLOWEEN TWO set.  She says:  "The paper that I used came from The Paper Studio Jeepers Creepers paper stack.  Please keep in mind that these pillow boxes are good for all occasions.  I used my  Pazzles Inspiration die cutting machine to cut out the pillow box."  Shelissa's blog:  Shelissa"s Craft Studio

Carmen created some lovely lanterns using the HAUNTED TREE and HALLOWEEN SET ONE files.  She says:  "I wanted to something that I have never tried before but admired so I colored mason jars with Paint and Mod Podge. I then cut some of Cindy’s great Halloween files out of Vinyl and adhered them to the outside of the jars. Decorated with some washi tape ribbon, twine and tags. I will put battery operated candles in them on Halloween and we will have loads of spooky at our house."  Carmen's blog:  Carmen's Creations

PLEASE READ BEFORE YOU ENTER THE CHALLENGE:
Please make sure that you follow our very simple rules to enter this challenge.  
You MUST use a SVG or similiar electronic cutting file in your project.  CRICUT CARTRIDGE ONLY ENTRIES ARE NOT ELIGIBLE.  Please make sure that you mention somewhere in your post what part of your project was created with a cutting file.  Entries that do not fit this basic requirement will be deleted.
Please see "Challenge Rules" tab for more info...


Challenge #20: Winner

We received 11 fabulous entries for this challenge.  (Sadly I had to delete two that did not follow the basic rule of the Challenge--you MUST use a SVG or similar electronic cutter file.)  Please click on all the creator's links for a closer look.  Thanks to those who entered and be sure to click on the "HOME" button for details on the current Challenge, which will always be the top post.
Challenge #20:  HALLOWEEN CARDS
randomly drawn winner of the $5 SVG Gift Certificate
is

Congratulations!
Please email Cindy at creative@avci.net to claim your Gift Certificate.

This Challenge's "Creative Choice" is   
#11 konica das
Konica said that this was the first Halloween card she has ever made.  Well I think she rocked it!  Love the cut file boots that are so wonderfully "blinged" up.  And she hand crafted the broomstick too.  Check out Konica's blog for the tutorial on how to make one yourself.  Congrats Konica!  Be sure to grab the "Creative Choice" button above and proudly display it on your blog.

Monday, October 7, 2013

Challenge #20: Halloween Cards


HALLOWEEN CARDS

If we receive at least 10 entries, the prize for this challenge will be a $5 Gift Certificate for SVG files from the Creative Pointe's ON LINE STORE.
You'll find over 140 SVG files/sets available for all your paper crafting projects.
If we have less than 15 entries, the winner will receive this SVG set:  JACK PUMPKINS.  Winner will be randomly chosen from all submissions.

One extra special entry will receive the"Creative Choice" button.

Ready for some inspiration? Let's take a look at what the Design Team created using SVG  diecuts.


Vicki created a very cool coffin card.  She says:  "The Creative Pointe's "COFFIN CARD" SVG makes a classic Halloween card a snap.  Of course, I couldn't just do a plain and simple pine coffin...no way...I embellished my little heart out for extra eerie fun!  Check out my blog for all the details".  Vicki's blog:  Paper Squirrel

Carolyn made two great JACK O'LANTERN CARDS.  She says:  "I created two Halloween cards with the "Jack O'Lantern Card" from Creative Pointe. On the first Jack O'Lantern card I used design paper for the pumpkin, layered on black background. The card base is brown cardstock by Stampin! Up. I found the spider file in the Make the Cut library which I converted to a SVG file and placed at the tip of the hat. The spiders I stamped with an acrylic stamp I have on hand.  On the second Jack O'Lantern card I used orange cardstock for the pumpkin and the card base is from my craft stash.  The small skulls in corner of each card is a SVG file I created.   Both cards will be sent to my granddaughters in Korea along with a small Halloween gift of candy.:  Carolyn's blog:   Granny Ma's Creative Blog

Cindy used the new SPOOKY SPIDER CARD to create this shaped card.  She says:  "Shaped cards are so fun to make and send...children especially love them!  This one is super quick and easy.  Check out my blog for details on the little touches I added to make this card extra fun."  Cindy's blog:  The Creative Pointe

The JACK O'LANTERN CARD was very popular for this Challenge and Ruth's version uses some lovely designer papers.  She says:  "Happy October! I had a lot of fun picking patterns and colors for my happy Jack-O-Lantern card! I love how the card front is shaped on the edge so you can see the paper inside of the card! Also, if you have a Silhouette machine and use the Silhouette Studio Designer Edition software and SVGs from The Creative Pointe, I've got a tutorial on my blog about my process when I use the files. I hope you're inspired to get cutting some fun Halloween cards!"  Ruth's blog:  Paper and Musings

 Octavia used all four files from the JACK PUMPKINS set.  She says:  "I used all four cuts for corner accents, backing them with  pumpkin ribbon.  The base of the card is an orange cloth swatch.  Inside I stamped "Happy Halloween" and embossed with neon orange powder."  Octavia's blog:  T's Corner For Scrappin'

Tina also cut her JACK O'LANTERN CARD using a Silhouette.  She says:  "I put this card together with a bit of help from The Creative Pointe's Jack-O-Lantern Card set, a set that has it all there--the card base and the die cut.  Talk about an easy way to put a card together. Check out my blog at Tina’s Scrap Corner for the details on getting this card cut and put together."  Tina's blog:  Tina's Scrap Corner

Carmen used the JACK PUMPKINS file to create two very cute cards.  She says:  "I created these cards using The Creative Pointe’s "Jack Pumpkins" file. This file has 4 cute little pumpkins and of course you can make them any size you want which is one of the best things about SVG files. I loved these little pumpkins, they all have such adorable faces and went together really easily. Would work well on any projects for Halloween."  Carmen'sblog:  Carmen's Creations

PLEASE READ BEFORE YOU ENTER THE CHALLENGE:
Please make sure that you follow our very simple rules to enter this challenge.  
You MUST use a SVG or similiar electronic cutting file in your project.  CRICUT CARTRIDGE ONLY ENTRIES ARE NOT ELIGIBLE.  Entries that do not fit this basic requirement will be deleted.
Please see "Challenge Rules" tab for more info...


Challenge #19: Winner

Sorry to say that we only received 3 fabulous entries in this challenge.  Please click on all the creator's links for a closer look.  Thanks to those who entered and be sure to click on the "HOME" button for details on the current Challenge, which will always be the top post.
Challenge #19: FOR THE GIRLS
Winner of the GIRLZ--SET ONE file

is

Congratulations!
Please email Cindy at creative@avci.net to claim your File.


Monday, September 23, 2013

Challenge #19: For the Girls


FOR THE GIRLS

If we receive at least 10 entries, the prize for this challenge will be a $5 Gift Certificate for SVG files from the Creative Pointe's ON LINE STORE.
You'll find over 100 SVG files/sets available for all your paper crafting projects.
If we have less than 15 entries, the winner will receive this SVG set:  GIRLZ SET ONE.  Winner will be randomly chosen from all submissions.

One extra special entry will receive the"Creative Choice" button.

Ready for some inspiration? Let's take a look at what the Design Team created using SVG diecuts.  Be sure to visit their blogs for all the details on their projects.


Starting us off is a lovely journal created by Vicki:  "A while back, I hit the mother lode in a Michael's clearance bin...oodles of hardcover journals for 50 cents each!  The catch?  The covers were garishly circus themed.  I bought several knowing that a little love would fix them right up.  Visit my blog to see how I used papers, embellishments, and The Creative Pointe's ROLLED ROSES and FANCY FLOURISHES-TWO SVG sets to create this girly journal."  Vicki's blog:  Paper Squirrel

 
Next is Carolyn's project, a lovely card created using the purse and shoe file from GIRLZ SET TWO.  "I created a gift card by attaching the two pieces of the blackout of the purse.  I also attached the tab to the back of the card, between the handle.  The clasp was cut three times from poster board and glued together. A 4th piece was cut and I used bronze pigment paint to color it then glued it to the poster board pieces to give the clasp some dimension.  The design paper is from a paper pack I purchased at Wal-mart.  I stamped the sentiment and then punched it out with a scalloped oval.  Inside of the card, I printed and cut the shoe heels and foam taped the red heels to the black backing.  I attached a ribbon to the top of the white piece of card and stamped with  a "happy birthday" sentiment."  Carolyn's blog:  Granny Ma's Creative Blog


Here's a cheery scrapbook layout created by Ruth:  "I sure hope you're as inspired as I am by the For the Girls Creative Cutting Challenge! I don't always take the time to scrap about my feelings about the special people in my life just focusing on one person and this challenge was the perfect opportunity for me to focus on my relationship with my daughter when I was a leader for her Girl Scout troop! So the FLORAL FRAME and the FLOWER SET ONE from The Creative Pointe were the perfect way to frame and embellish my page about my favorite Daisy Girl Scout! I hope you enjoy my page and I hope you're inspired to play along with the challenge!"  Ruth's Blog:  Paper and Musings

Cindy created a trio of PURSE CARDS.  "I had so much fun making these and creating the "faux" croc, patent leather and tortoise shell elements.  This new SVG file comes in two card sizes---making it so easy to use up all your scraps.  Hop over to my blog for the "faux" details and individual purse photos."   Cindy's blog:  The Creative Pointe

Carmen created a very cool mixed media project:  "This time I choose to work with FANCY FLOURISHES TWO.  I cut a stencil with multiple flourishes, using a prepared canvas applied texture medium.  I love the affect!  I added my daughter’s name and cut out a few more flourishes to decorate with as well as a peace sign and heart perfect for the 12 year old girl."  Carmen's blog:  Carmen's Creations

Octavia created this pretty in pink layout using all the files from GIRLZ--SET ONE:  "I wanted to reflect what a little lady I have.  Using all four cuts from this set:  mirror paper for the mirror, embossed the perfume bottle, named the polish (pretty pink-pink) and used mirror paper for the lipstick case for that chrome look.  I stamped "sweet girl" and embossed it with UTEE for dimension."  Octavia's blog:  T's Corner For Scrappin'


Shelissa also created a purse project and these were made into gift bags!  "I used the GIRLZ--SET TWO SVG cutting file that can be purchased from The Creative Pointe's online store.  The purse and shoes were cut out using my Pazzles Inspiration die cutting machine. The brown side of the purse was embossed using the Sizzix honeycomb embossing folder and I cut out the shoes with some paper from my stash.  On the front I used the same paper and some bling. Lastly, I used a blue paper sack that I picked up from Michael's and cut down to fit in between the two purse cutouts."  Shelissa's blog:  Shelissa"s Craft Studio


Tina created this feminine card using the ROLLED ROSES file.  "I put this card together with a bit of help from The Creative Pointe’s Rolled Roses set.  A little glitter among the petals just makes the roses a bit more special for a really sweet birthday card. The roses cut so well that they are a breeze to put together. Check out my blog for the details on rolling the roses."  Tina's Blog:  Tina's Scrap Corner

PLEASE READ BEFORE YOU ENTER THE CHALLENGE:
Please make sure that you follow our very simple rules to enter this challenge.  
You MUST use a SVG or similiar electronic cutting file in your project.  CRICUT CARTRIDGE ONLY ENTRIES ARE NOT ELIGIBLE.  Entries that do not fit this basic requirement will be deleted.
Please see "Challenge Rules" tab for more info...


Challenge #18: Winner

We received 20 fabulous entries for this challenge.  Please click on all the creator's links for a closer look.  Sadly we had to delete quite a few lovely projects as they did not follow the basic requirement:  Your project MUST use at least one SVG (or similar) electronic cutting file.  Cricut cartridge only or manual die cut elements only in a project are not eligible.
Thanks to those who played by the rules and entered.  Be sure to click on the "HOME" button for details on the current Challenge, which will always be the top post.

Challenge #18: ANYTHING GOES
randomly drawn winner of the $5 SVG Gift Certificate
is
#9 Kerry Hocking
Congratulations!
Please email Cindy at creative@avci.net to claim your Gift Certificate.
This Challenge's "Creative Choice" is   
This amazing card has so many awesome cut elements, that you really need to go to Christine's post to get the details.  She created this birthday card especially for her son and it is truly a work of love and art.    Congrats Christine!  Please grab your button from above.

Monday, September 9, 2013

Challenge #18: Anything Goes

Welcome Back to Season Two!!
Hope everyone had a fantastic summer and is ready to get back into the cutting groove.
We've expanded our Design Team so now you'll have at least nine fabulous cut file projects to inspire you every other week.  For those of you who want to play along, we'll still be offering a prize for the random winner of each challenge.  Plus one special entry will still be highlighted with a shout out and given the coveted "Creative Choice" button.  So grab your crafty cutting friends and lets get started!  

ANYTHING GOES
Prize for this challenge is a $5 Gift Certificate for SVG files
from the Creative Pointe's ON LINE STORE.
You'll find over 140 SVG files/sets available for all your paper crafting projects.
Winner will be randomly chosen from all submissions.

One extra special entry will receive the"Creative Choice" button.


Here's what the Design Team came up with for you...
 
Carolyn created this two page layout of her great grandson Carson attending his first car show with his grandpa.  She used the CAR SET to cut photo mats, the heading and journaling blocks.  The shaped street, street lines and stop sign are from "Birthday Haul" by Creative Kuts Crop-on-Line Kit.  Please visit her blog for more details:  Granny Ma's Creative Blog

New DT member Carmen created a Chinese Take out box and says:  "I used The Creative Pointe's CHINESE TAKE OUT SVG files for embellishment. The actual take out box is from Sherry K. Designs, stamp is from Mark's Finest Papers - Be Virtuous -and the paper, ink and twine is from Close to my Heart.  I used my trusty eCraft by Craftwell to cut out the SVG files."  Carmen invites you to check out her blog for the paper fortune cookie tutorial:  Carmen's Creations 

Close up views:
 
Our other new DT member Ruth created a cool two page layout using the BOWLING SET.  She says:  "Hi!  I'm so happy to be here on the CCC Design Team!  I absolutely have a blast using my Silhouette to cut whatever shape I need for a project and everything coordinates just the way I need it to because I'm making it myself!  For my layout, I am scrapping about a geocache event that my husband hosted where they went to see The Big Lebowski, one of my hubby's favorite movies.  I knew that the Creative Pointe's Bowliong Set was perfect for my page, with the bowling pin border (doubling as a subtle journaling area) and the bowler supporting the bowling theme of the movie!  I hope you'll join in with the challenge!  I can't wait to see what you create!"  To see more, please head over to Ruth's blog:  Paper and Musings

Cindy created a layout using the CATS set and says:  "I put this layout together to remember a very special scrapbook event that is held in honor of a good friend who was a victim of domestic violence.  Each year I and my peeps have dressed up in a theme.  Last year we were the "Croppy Cats", so my Cat set was perfect to use to create the heading and journaling element."  For all the details and a link to this year's "Mary's Dream" event, please go to Cindy's blog:  The Creative Pointe

Vicki created two cute cards for this challenge using the new PHOTO PROPS set.  She says:  "The Creative Pointe's Photo Props SVG set has so many possibilities.  Now, the most obvious is to cut the props exactly as Cindy has scaled them for true photo props (these were SO MUCH FUN at our wedding!!).  I wanted to give you even more inspiration for this fabulous set.  After being away from the craft room for a while this summer, I was getting very low on birthday cards, especially some suitably masculine ones.  These punny cards were quick and easy to make using scrap patterned papers, Cricut, and laser printer.  For more details please check out Vicki's blog:  Paper Squirrel

Octavia also used the BOWLING SET to create her layout.  She says "Using the Bowling Set I cut the pins for the highlights of my page and made circles for my pin set up.  Using the "Let's Roll" and the bowling ball separately gave the page more dimension and action.  For my picture mats, using SCAL, I welded the names to the mats before cutting, positioning the names at different points.  This was a great set to use for our ladies night at the lanes!"  To find out more, please click over to Octavia's blog:  T's Corner For Scrappin'

Next up is Shelissa who created a very unique mask using the CAT MASK.  She says:  "I used the cat face SVG cutting file from The Creative Pointe.  The cat face, eyelashes and whiskers were cut out using my Pazzles Inspiration die cutting machine. The face was painted using Viva 3d Stamp Paint. I used diamond  Stickles to decorate around the eyes and nose. Lastly, I used some bling that I picked up from the scrapbook expo."  Check out Shelissa's blog to see a video of this project:  Shelissa"s Craft Studio

Pam created a tag using the GEAR FRAME to create this lovely tag.  She says:  "I used distress inks and gelato to distress my tag and cuts.  Jute twine and crinkle ribbon were used for accents and the "for you" is hand written."  Please visit Pam's blog for more details:  Scrapple Tree

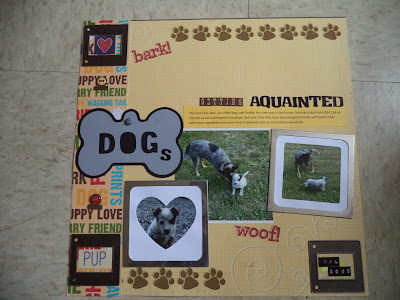
Last but not least is Tina with a sweet layout of her dogs using a file from the DOG ELEMENTS set.  She says:  "During my hunt for some metal family labels for a layout,I came across the metal dog tabs and frames and knew I had to do a dog layout too. I used the dog tag from the Dog Elements collection for part of my title included the (s) on the side for the plural of the dogs. It was a good addition to the layout. (aquainted) Common misspelling of acquainted, as you can see by my title I mis-spelled-- do I fix or let it go?"   For more details about the layout and to answer Tina's question swing over to her blog:  Tina's Scrap Corner

PLEASE READ BEFORE YOU ENTER THE CHALLENGE:
Please make sure that you follow our very simple rules to enter this challenge.  
You MUST use a SVG or similiar electronic cutting file in your project.  CRICUT CARTRIDGE ONLY ENTRIES ARE NOT ELIGIBLE.  Entries that do not fit this basic requirement will be deleted.
Please see "Challenge Rules" tab for more info...